
This article is a part of Series: The Knowledge Workflow
- Personal Knowledge Flow. Find the missing links of your mental process
- Note-taking workflow: To build and extract knowledge from digital notes
- Building blocks of true Knowledge: Atomic understanding
- Beginning of original thinking: Reflective thinking
- Purpose of Trigger points in PKM (No, NOT keywords)
What is digital knowledge building? Is it not an intangible thing in our minds? If so, how can you manage them digitally or by taking notes, and what’s the need for it? I took numerous notes in the past, but I revisited a few to none and nothing of my knowledge is preserved or can be used in the future. It’s very hard to take notes and harder to make sense of it with multiple notes and almost impossible to innovate with my cluttered notes.
These are the questions and skepticism in your mind, I presume. Yes or no, either way, this article is my best attempt to answer all those and share my evolved method of digital knowledge management system I personally use.
Preface: If you’re not familiar with your own Personal Knowledge Flow. Try to find the missing links of your mental process (part 1) before you proceed with this article of note-taking for knowledge (part 2). I strongly recommend you subscribe to Alvistor newsletter to receive future articles on this series. I only brief the methods here leaving more room for you to customize and use them in your own style (use the comment section at the end of this article for doubts and feedback). Credit: This method is highly inspired by Tiago Forte’s Progressive Summarization which I’ve been using for 3 years.
Unfortunately, this method of summarising will not work well with learning mathematics, derivations, equations, etc.
Step 1: Combining Source
In the general case, a web article, a digital book (eg. ebook from Kindle), PDF textbook/doc, etc act as your source. It’s better to take notes for every individual source with this method so that combining them later will be a cake-walk for you.
If there are multiple sources (few blog articles and a book) for one topic, you should consider taking notes for each source, not for a single topic it falls in.
In some cases, you might be collecting a few lines of information from a source which is not containing more than that. If it is a piece of meaningful information, These chunks of information may be appended to your primary source.
In the case of academia & research, you may be having lecture notes (given by your professor), your notes (taken while in the lecture), teaching-texts or textbook, etc. For this, I suggest you roughly order them as sequential as possible (else in one place/folder) when you convert to digital. (If you have written notes, You can try scanning your written notes with apps like Evernote (which can hold all your source of different types) or other apps that have OCR capabilities to convert them to digital text. This will not work in all cases).
Once you collected them as one long source, try to remove the unwanted formattings and simplify your note as much as it allows you to. Making this source-note editable (at least highlightable in the case of pdf) is the first step.
Step 2: Primary review / Bolding passages
This step is similar to what you been doing so far to take notes. But here, we are going to do with ease. All you have to do is read your source and go with the flow of reading/understanding. Whenever you come across a line that you feel important, meaningful, relevant, new (to you) just select them and “bold” them. (If your application is not allowing it, then underline them).
If you have a dilemma about whether to bold a particular passage or not, just bold them if you stuck at a particular line. Because you need to be in the flow of reading and bolding side by side, instead of being stuck at a particular point. In a practical sense, you can’t find out what’s important and what is not at first glance. This step is more of a process of elimination (of unwanted info) rather than finding important points.
Remember this is not where you take notes, you’re just skimming to find relevant and meaningful info from your source and marking them to refine in the next step.
General guideline for bolding passages
Read & Bold, don’t try to make your decisions harder. If you see anything concise and straightforward bold them. Bold important passages, key sentences, any chunk of a sentence which should give meaning if you only read the bolded passages.
Bold passages should not truncate the relevancy and context of the point. So select a wide sequence of words (but not wider).
Overall, all your bold passages should cover the Core Essence of the Content & Encapsulate Ideas of the source. Bold Definitions, Theorem, Final Findings, Quotes, Concise-Conclusion-Statements, Sentences that are critical to understanding the concepts.
Extracting the core idea that you need now and also for possible future needs. The one mistake we do is we take notes for current needs, but here if you feel this particular point might be used in any place in future or it might be helping your future reference, then select them to.
The whole aim is, whenever you revisit your note, you don’t have to read it from start to end to find the important relevant points. Compressing the size of the note in this way makes it easier to refer to in the future.
DO’s
- Bold anything new for you to know
- Bold concise, straightforward sentences
- Bold anything you agree with and not agree with
- Phrases you want to take-away as it is
DO NOT’s
- Don’t bold the examples, explanations
- Don’t bold repeated points twice
- Don’t waste your time in reinventing the wheel, i.e. don’t bold things you already know well.
Step 3: Highlighting Keys/Keywords
So far we prepared the notes and understood what it carries as meaning and marked them in bold. Now we start again like previous step (do not make a copy of it, use the same note for all these steps) but this time, we only gonna look at bold passages and pretending blind to those other sentences.
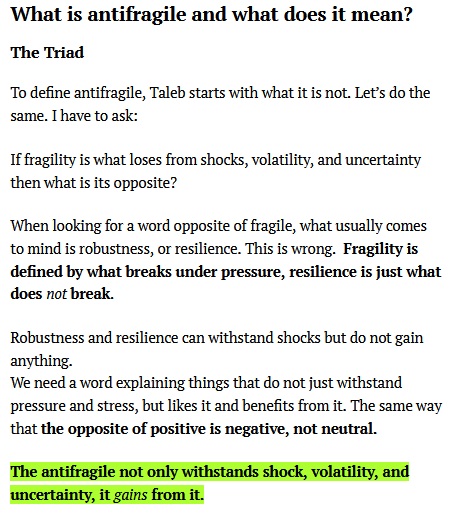
Highlight the Best of the Best passage, Keywords, Trigger Keywords, Key Phrases, new words, or names that are introduced, pivot points that connect you to what you already know and what’s new in the notes (Like I did in this paragraph and in next & check below-attached picture as example).
Trigger Points/Trigger Keywords are mostly words or a few sequences of words that will remind you of the whole concept (in the bold passages) if you see it in the future. They just act as a trigger to your brain to recite.
DO’s & DO NOT’s
- Highlight the best of best phrases inside bolded sentences, keywords, terms, and words that help you to remember the idea associated with the term.
- Don’t highlight outside your bold passage.
Credits: Time Traveling with Progressive Summarization
Why Bold and then Highlight?
Most of the time we skim, it is passive. Reading is hard and need active participation. We do not revisit our notes often, even if we did, we only see it and 99% never willing to read our own notes. But assume all you notes has bold and highlights like I mentioned, you only got to see your highlights to remind all of the things related to the note, without even reading it. Even if you couldn’t recollect some info, then you can go one level deep (not starting over) to reading bold passages. This should be enough for most use cases. But if you do the next steps right, you will never have to revisit your notes, still having the previous knowledge of your notes.
Step 4: Summarising
This is where your original step of note taking for knowledge comes in. The note layers from the past 3 steps will be preserved for the future reference and context. It will help you to refer the facts from source and act as a proof for your claims in the knowledge you acquired.
Now summarize. Based on what you highlighted and bold summarize what’s in the source. Then add your points/idea/insights to it specifically differentiating it from the source idea.
Where to write the summary? You can write above your source-note or below at the end. The top is the optimal place, so whenever you revisit your note you see your summary first. For advanced digital knowledge building, you can summarize in special knowledge/mind-mapping+notes building apps like RoamResearch to connect your thoughts & summary with your other notes summary.
It depends on your work, whether you take an informal summary (for gaining and building knowledge for creativity and innovation) or a formal summary (along with building knowledge digitally, for reusing the learned concepts in your future work like writing, research articles, etc) or even both.
Taking informal summary
Write a summary in your own words (if you can’t comprehend and explain it to someone, then you didn’t understand it well yourself). Check this knowledge flow if you want to know when to summarize. It’s your summary, your words and it is for you. So don’t worry about grammar or structure as long as it gives meaning to you. Do not copy-paste from the source note. This will reduce your knowledge retaining capacity drastically.
Write for your-future-stupid-self. Don’t write for the current version of you. Take a moment and think will you understand this summary if you forget everything you read on this note? Never skip anything even if it feels so easy to remember now. (You only retain less than 5% of the note after a year.)
Add keywords, context information that you anticipate to use in search in the future.
Taking formal summary
In addition to the informal summary, you should be using a complete sentence that can be reused in your future work. Add points and reasons under those sentences (as a separate point) for ideas that you agree and disagree with your insights. Especially ideas opposing the current notes will improve your summary than summarizing the actual notes.
Every sentence you make should be atomic and has enclose its meaning within itself. If you needed a para, then keep every para atomic, independent of other para/sentence. This will help you to reuse them in future without changing much. Work once and thorough, so you can use it in future multiple times for different needs.
The significant benefit of this formal summary is you can extract knowledge out of your notes in a blink of an eye and it is ready-made to use then and there.
Step 5: Mapping & Remixing
This is where you build new knowledge, ideas with your summarised notes. Innovation & Creativity triggers are well supported in this layer. Seeing notes at this level gives you an abstract view of many concepts interconnected and the opportunity to give rise to new ideas which usually called creativity or innovation.
Add connections & Map your points
I urge you to subscribe for Alvistor.com newsletter to know & understand more about this by reading following posts in this series. Add links to your relevant notes first, then to relevant concepts by mentioning their keywords. (You can hyperlink your notes if you using the notes app of your choice for beginner level. For intermediary and advanced usage, please go for mapping apps that support notes out of the box like RoamResearch)
After adding relevant notes to the current note in hand, move to adding supplementary notes and pre-requisite concepts (which you already having in other notes or to learn newly).
One important mapping data is adding few lines on future possible implementation ideas. Adding words that you use to search in the future about a particular idea so that this note will come up in the search result when you need it. It’s impossible to predict the future, but try to add every relevant word in this step.
Remember, I only briefed the method. Different digital note taking apps works in different way. You can customise this method to adapt your needs and skills.
Remixing
This is where you create a new note and add extracted concepts from all your notes in one place. Usually, this note is called “evergreen” notes. Whenever you take a note under a specific area or topic, you update this ‘evergreen’ note with the final extract. This one note will give you an Eagle-Eye view of all the concepts under the same topic. This where your true knowledge crux resides. (I explain this in later posts).

The beauty of this method is, you didn’t cluttered your notes when you worked on it. You iteratively, spruced it up while extracting your knowledge out of it. You now have layered stack of notes one above another.
- Source – Base Layer
- Bold passages – Concept Layer
- Highlights – Keywords/Critical points Layer
- Summary – Crux/Ideas Layer
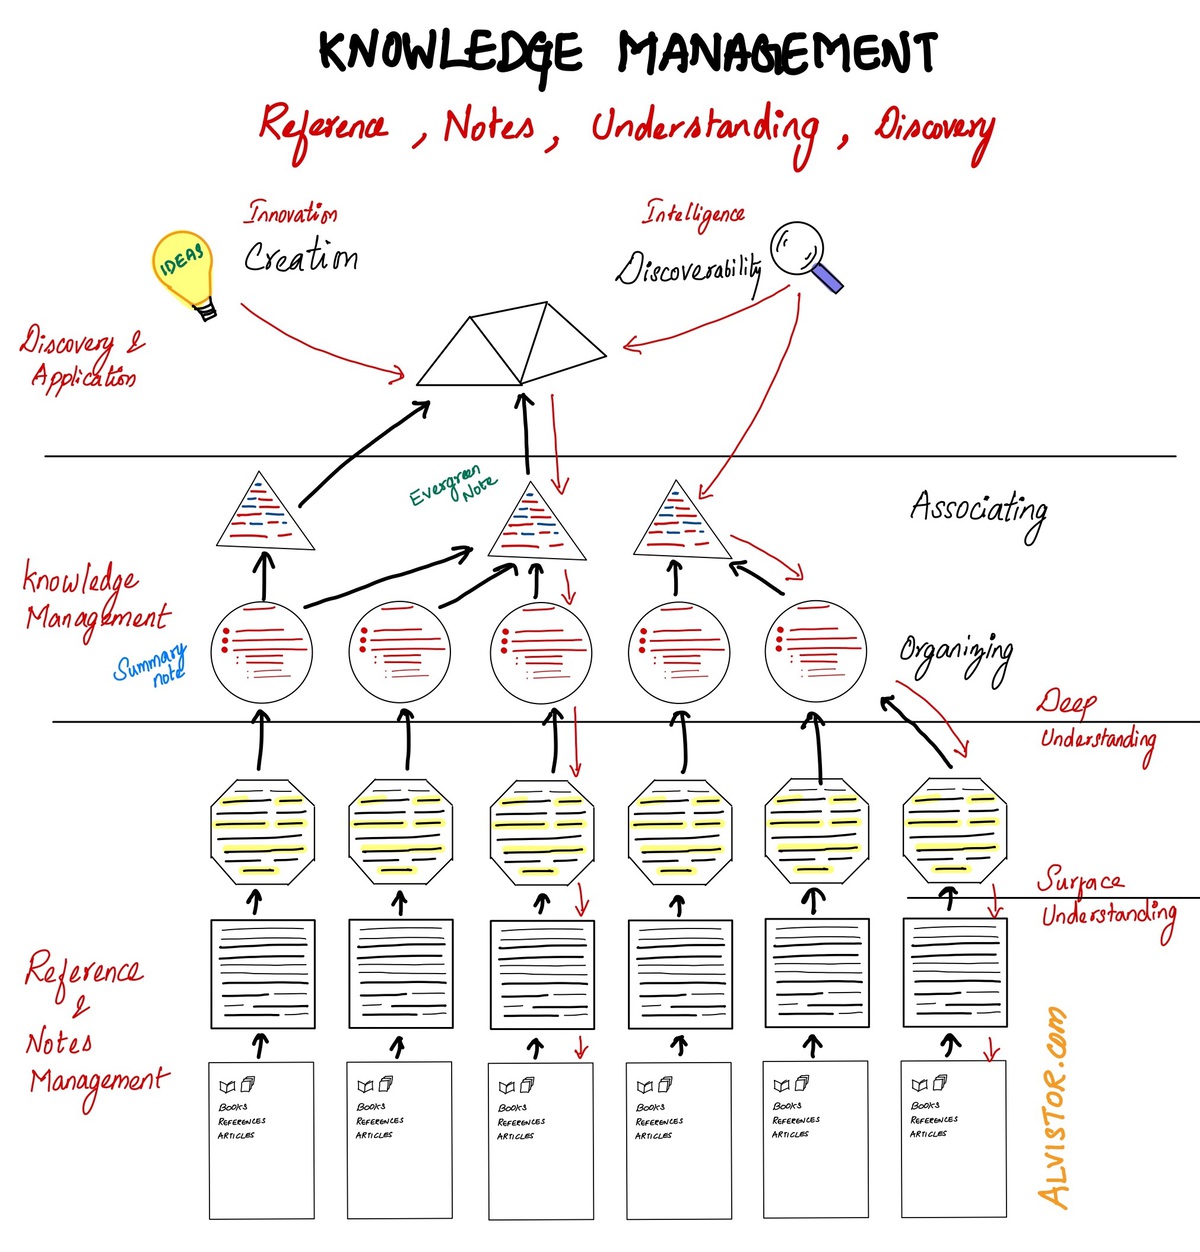
- Mapped & Remix – Knowledge/Innovation Layer

As a whole, your collected group of notes will maintain a virtual hierarchy as sketched below. Reading this sketch with the concepts told in personal knowledge workflow will give you more understanding of why we doing this.
It balances between discovering a point in your deeply buried notes and connects the relation between broadly distributed topics/areas.
You can Spend more time in reading and taking notes and later you can feel you have read nothing and knew nothing. This is because you didn’t do it right. Knowledge can be acquired with minimal effort because acquiring is not the difficult part. The difficult part is thinking and understanding. Give more time and space for your brain to think and understand than remembering and reciting.
Wish you for your new productive knowledge workflow.

One Comment